I'm using Lando for local development which is like Docker Compose, just a bit more DX focused.
Lando offers a streamlined experience but I didn't like the .lnd.site domains for my projects. So I want to use another one - in this case .code domains. The Lando docs on using a custom domain are not that great and it didn't work for me out of the box.
This post will provide step-by-step instructions on how to setup a custom domain for local development projects using dnsmasq - this will also work besides Lando.
Install & configure dnsmasq
I will use Homebrew for convenience since the DNS service is automatically booted on system startup.
brew install dnsmasq
Lando config
I've modified the Lando config to use a custom domain name and also enable the Traefik dashboard on http://127.0.0.1:50572/dashboard/
proxy: "ON"
proxyName: lando-proxy
proxyCommand:
  - /entrypoint.sh
  - "--log.level=DEBUG"
  - "--api.insecure=true"
  - "--api.dashboard=true"
  - "--providers.docker=true"
  - "--entrypoints.https.address=:443"
  - "--entrypoints.http.address=:80"
  - "--providers.docker.exposedbydefault=false"
  - "--providers.file.directory=/proxy_config"
  - "--providers.file.watch=true"
proxyCustom:
  api:
    dashboard: true
    insecure: true
domain: code
stats:
  - report: false
channel: stable
Option 1: Local DNS only for .code
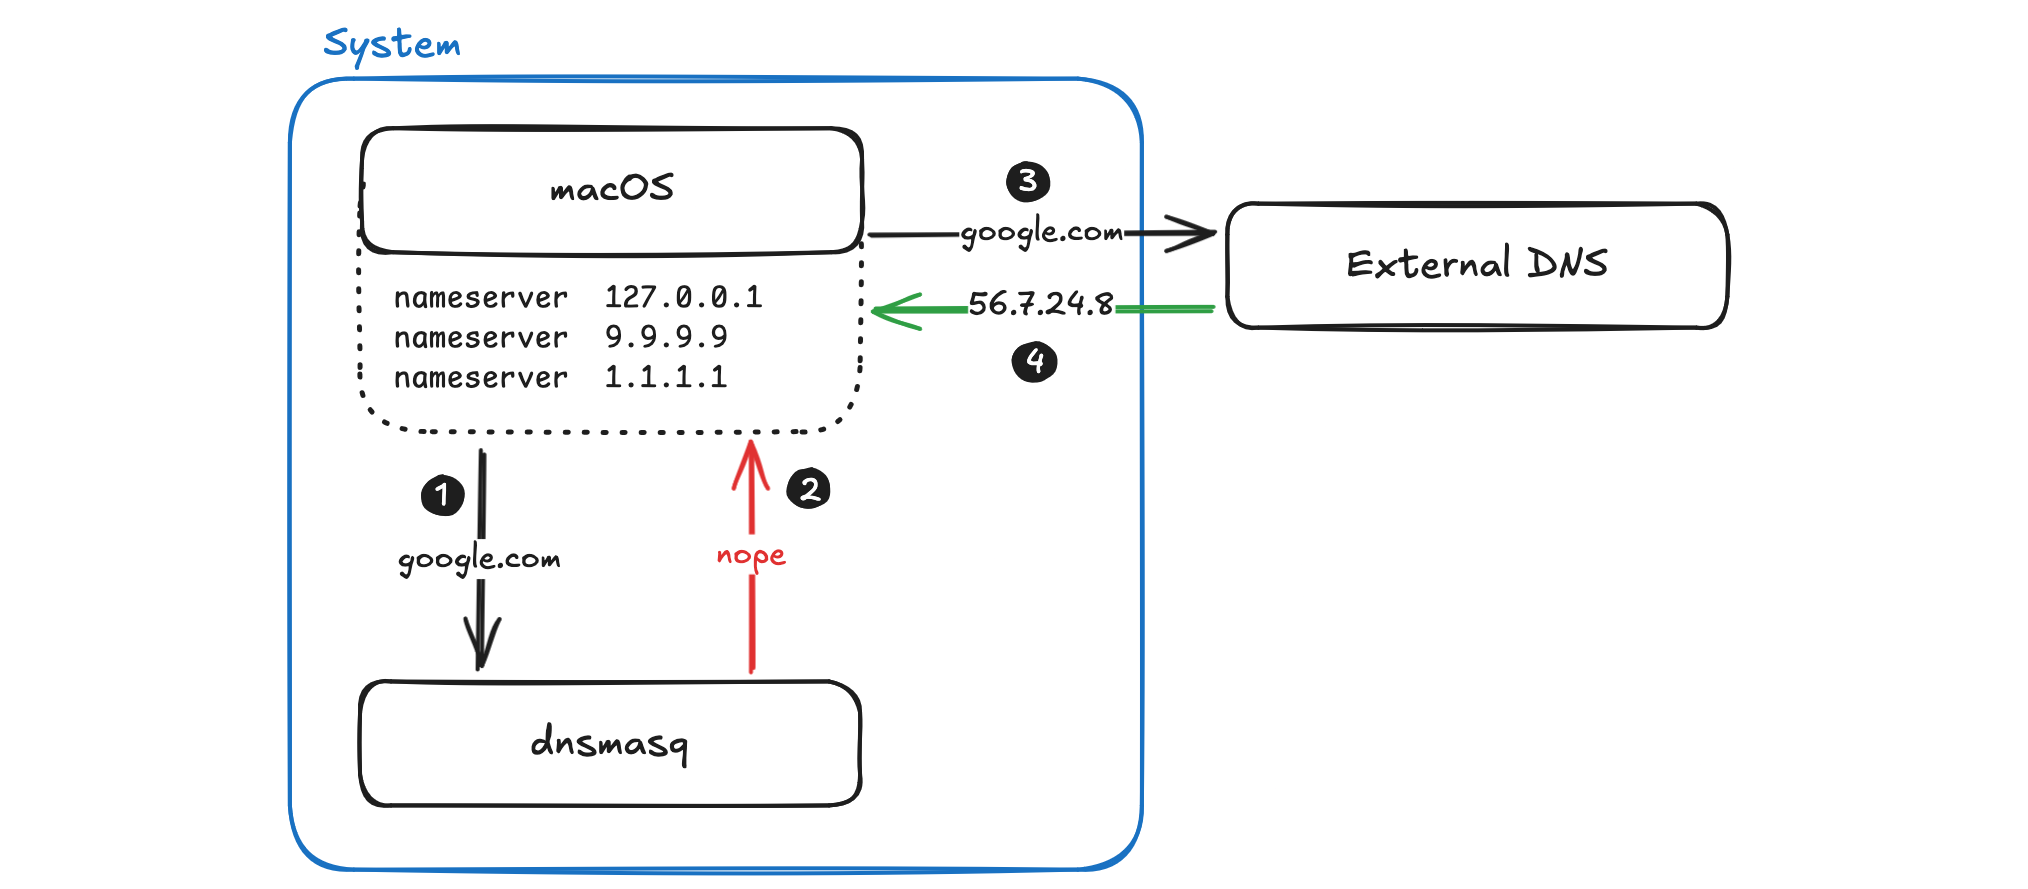
This option will make your local DNS server only handle local domains.
Good: Makes your local DNS server kinda secondary
Good: Most other things work if you f*ck up
Bad: Cached responses from external DNS providers can confuse
Create resolver
This will instruct macOS to resolve code TLDs with our local nameserver. Other domain names will be forwarded to our systems default DNS servers.
# Create .code resolver
echo "nameserver 127.0.0.1" | sudo tee /etc/resolver/code

# Verify it's registered
scutil --dns | grep code
Configure dnsmasq config for the .code domain
This will instruct dnsmasq to resolve and *.code DNS queries to localhost 127.0.0.1
/opt/homebrew/etc/dnsmasq.d/code.conf
# Add domains which you want to force to an IP address here.
# The example below send any host in double-click.net to a local
# web-server.
address=/code/127.0.0.1

# For debugging purposes, log each DNS query as it passes through
# dnsmasq.
log-queries
log-facility=/var/log/dnsmasq.log

# Include all files in a directory which end in .conf
conf-dir=/opt/homebrew/etc/dnsmasq.d/,*.conf
Option 2: Local DNS as single-source-of-truth
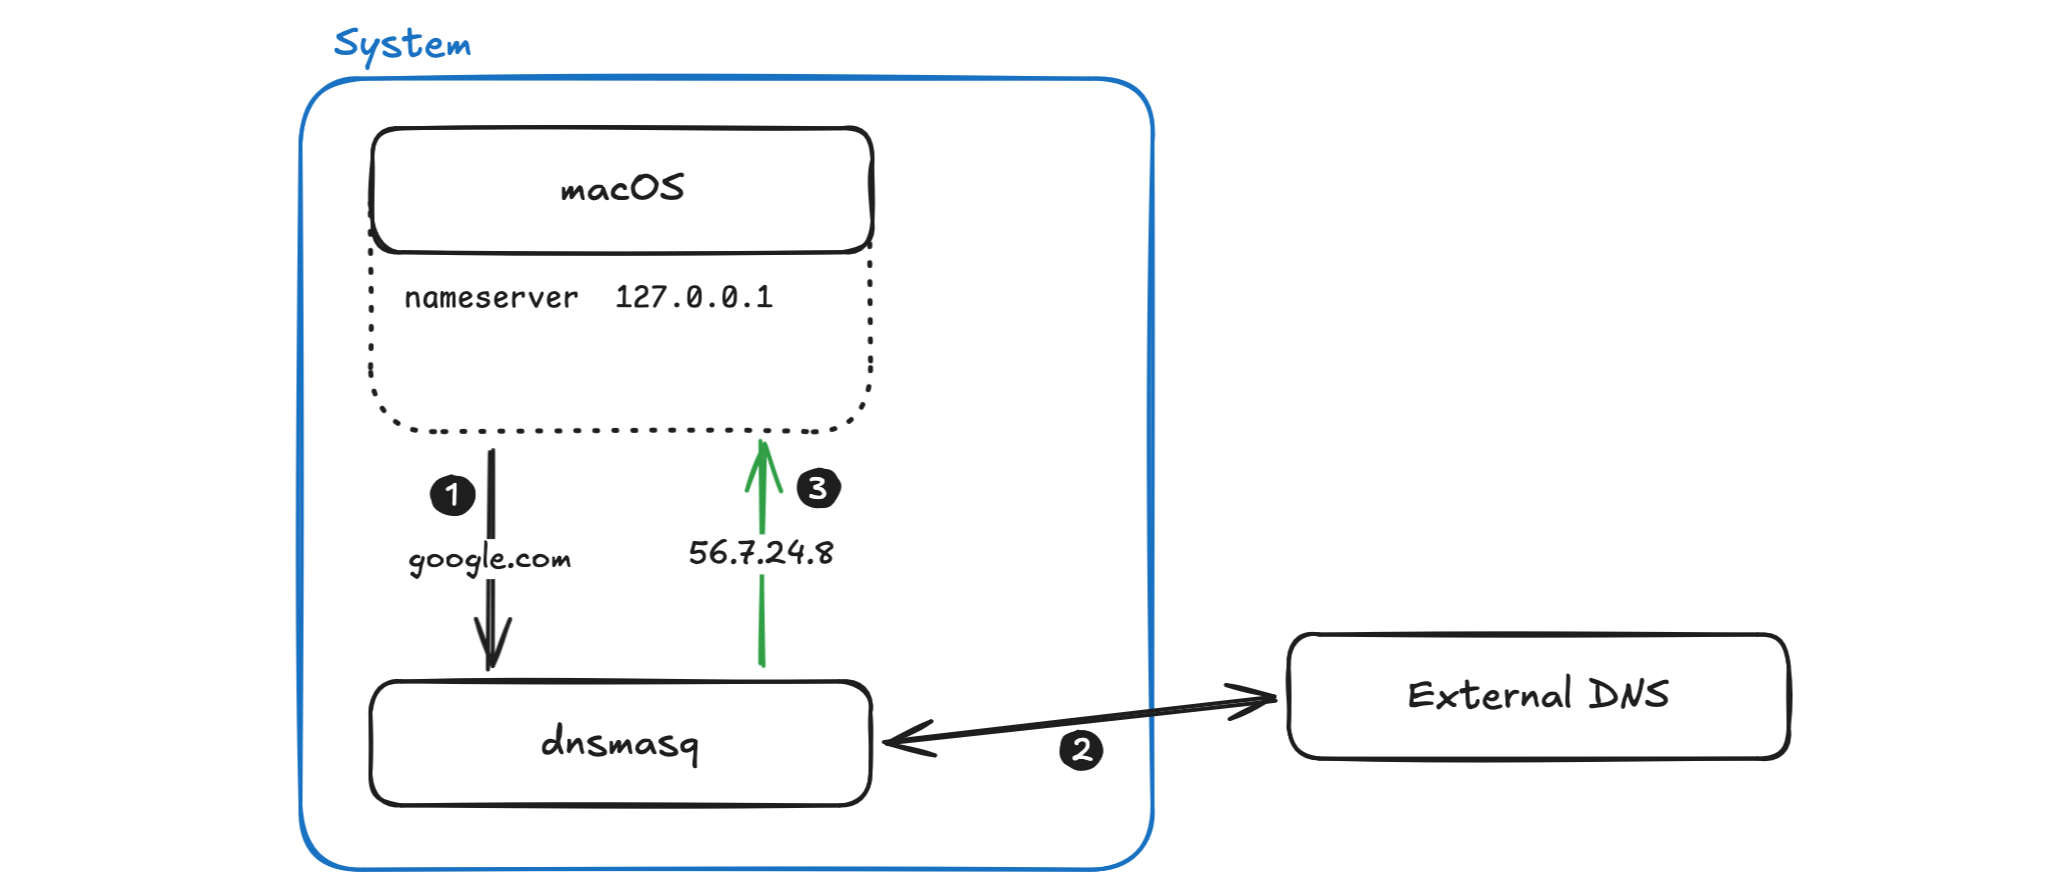
This guide will make your local DNS server the only DNS server your system relies on. DNS calls to unknown domains will be forwarded by your local DNS server to third party providers.
Good: Single source of truth for configuration
Bad: No DNS if your setup breaks
Bad: doesn't work with some VPNs
Configure dnsmasq config for the .code domain
This will instruct dnsmasq to resolve and *.code DNS queries to localhost 127.0.0.1
/opt/homebrew/etc/dnsmasq.d/code.conf
# Add other name servers here, with domain specs if they are for
# non-public domains.
server=9.9.9.9
server=149.112.112.112

# Add domains which you want to force to an IP address here.
# The example below send any host in double-click.net to a local
# web-server.
address=/code/127.0.0.1

# For debugging purposes, log each DNS query as it passes through
# dnsmasq.
log-queries
log-facility=/var/log/dnsmasq.log

# Include all files in a directory which end in .conf
conf-dir=/opt/homebrew/etc/dnsmasq.d/,*.conf
Setup system wide DNS
Now we'll tell macOS to use our local dnsmasq name server for all DNS queries.
Go to System Preferences
Go to Network
Select your Network Interface
Press the Details... button
Go to the DNS section
Add
127.0.0.1as DNS server
Now, restart your system and you should be able to access your Lando projects on your new custom domain.
Note on using VPNs
When using VPNs like Mullvad with this configuration, you may run into issues where your local dnsmasq server can not forward DNS queries to other DNS servers. This is a known issue with Mullvad VPN.
Your best bet now is just to add the project Domains to your /etc/hosts file.
Debug
Rebuild Lando projects
If you've already built projects with Lando, make sure to rebuild them so all traffic is correctly routed.
lando rebuild -y
Verify dnsmasq is running
sudo brew services restart dnsmasq
sudo brew services stop dnsmasq

ps aux | grep dnsmasq
Start dnsmasq manually to see errors
For this, you need to stop any processed run by Homebrew.
sudo dnsmasq --no-daemon --log-queries
Check dnsmasq configuration
Ensure 127.0.0.1 is the first DNS server.
dnsmasq --test

cat /usr/local/etc/dnsmasq.conf
cat /etc/resolver/code
Check if your macOS firewall is disabled
The following command should output "Firewall is disabled. (State = 0)"
sudo /usr/libexec/ApplicationFirewall/socketfilterfw --getglobalstate
Check if macOS is using dnsmasq as DNS server
Go to System Preferences
Go to Network
Select your Network Interface
Press the Details... button
Go to the DNS section
Add
127.0.0.1as DNS server
Test DNS resolve
dig my-project.code
nslookup my-project.code
In the dig output, you should get something like
;; ANSWER SECTION:
my-project.code.      0       IN      A       127.0.0.1
scutil --dns
Read more...
How to style <progress> Element with Tailwind
Styling the HTML progress element isn't as straight forward as you think. We'll take a look and craft pretty progresses with Tailwind CSS.
Laravel dd() not showing Dump as HTML
I recently ran into an issue where the Laravel dd() Helper did not show anything, what the heck?
Comments